Welcome to Notify: An overview of our new Messaging Platform

In the new version of E-Notes; Notify, Gabbart Communications is proud to present some significant strides towards improving the user experience of this program. Let's go through the new changes.
There are a few new features that we hope will be very convenient for sending out notifications to your various user base (i.e. Parents, students, staff, and members of your community.)
The first change you will notice is the new Notify Advanced Dashboard The dashboard consists of different sending options and additional managing tools. The article below will take you through the new Dashboard.
Adding Subscribers
SIS Integration
Notify 2.0 is dynamic and the data for your subscribers can be pulled directly from your Student Information System and placed into corresponding campus/grade levels/staff lists.
Changes to a subscriber's contact info will be imported and updated in the overnight sync.

If your Student Information Sytem is not synced with your Notify Messaging System and you would like to set up the integration please reach out to
support@gabbart.com
You can also manually add additional subscribers. Click Profiles from your Notify Dashboard and Click 'New Profile' to manually add a subscriber or 'CSV Upload' to upload multiple subscribers quickly.
Sending Options
We'll go through the different sending options first then show you how to send messages.
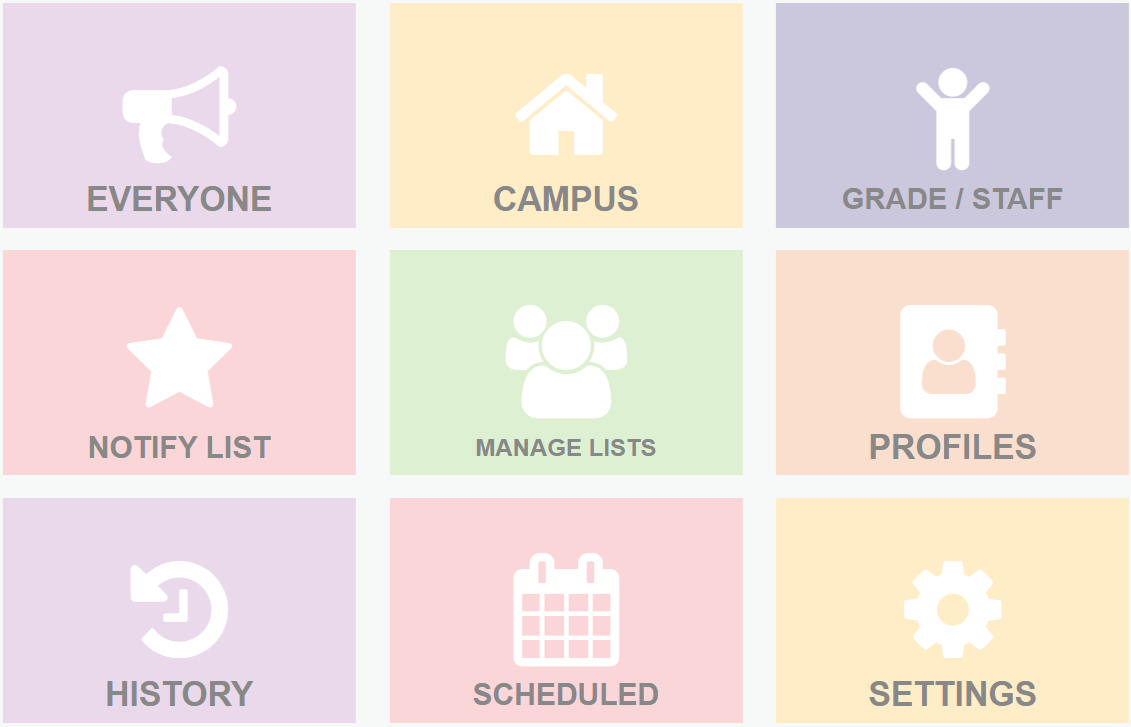
Everyone
Clicking the 'Everyone' tile will start the process of sending out a notification to all profiles that have been loaded into the system, whether they have been entered manually or integrated through your SIS (Student Information System.)
Campus
Clicking the 'Campus' tile gives you the option to select a specific campus or multiple campuses to send your message to.
Grade/Staff
Clicking the 'Grade/Staff' option gives you the ability to choose a specific or multiple grade levels and staff to send your message to. This option can also be used to send out a Staff Only message.
Notify List/Profiles
Clicking the 'Notify List' option gives you the ability to send to one or multiple manually created lists. You can also send to specific profiles for messages that need to go to a specific student or group of students.
Sending Messages
After selecting who you want to contact (everyone, campuses, grade/staff, or Notify list) you should be asked the question "How would you like to send your message?", then depending on which types of communication you have in your contract you should see up to five (5) options to send out notifications:
1. Send as E-mail - Unlimited characters and the ability to attach photos, documents, and links.
2. Send as Text Message - 280 character limit can include URL links. We recommend custom URLs so links are delivered correctly.
3. Send as Phone Call - Choice between Robocall and manually Recorded messages.
4. Send as App Notification - If you purchased the app this is another way of pushing notifications out to everyone who has downloaded your app. 400 character limit must be text only.
5. Send to Social Media - If you have logged into social media in your social media settings you will have the option to push to Facebook and Twitter. 280 character limit can include URL links.Each of these options will have a 'Yes' or 'No' option. Click 'Yes' to send out your notification in that form of communication. Choose 'No' to prevent this communication from sending. Then click 'Next'
From here, we need to 'Build Your Message', you can simply input the message you would like to be sent and that will send out in the communication forms you indicated or you can click 'Customize Messages'
This area will allow you to tailor your message sent out in the various methods of communication, if you want to send out a pdf flyer with your email notification, the full-text editor will be available for your emailing portion of your message and it is all handled in the same location, same screen, within the same message.
The phone call customization option allows you to record your own message or use text to voice options to send a robocall. After making your adjustments, click 'Continue.'
This screen is to confirm the type of message you are sending and the total contacts the message should send to.
You can enable message translation by checking the box before selecting when you want to send the message.
Clicking 'continue' indicates you want to send the message now or you can click 'schedule' to choose a date and time for the message to send.
Select the date and time for your message. You can schedule a message between the hours of 6:00 am and 10:00 pm using the yellow Schedule button. To send immediately you can proceed with the green Send Now button
Scheduled messages can be edited at a later date from the scheduled section.
Management Tools
For easy access and quick list management, your Dashboard also included managing and editing tools. This section will take you through the tools included on the messaging Dashboard.
Manage Lists
This area allows you to quickly create/delete custom lists, edit existing list options, add, or add additional subscribers to a list.
Manage Profiles
The Profiles button gives you the ability to manually add subscribers, bulk upload users via CSV file, manage users' subscriptions, and edit manually added subscribers. (SIS subscribers will be updated overnight when changes are made to the SIS) This is also where you will delete any profiles, you can now also merge profiles using the Merge Profiles button above the profile list.
History
The History section provides you with details of every message sent including when the message was sent, the content of the message, who the message was sent to, sending method (email, text, call), and who sent the message.
Scheduled
The scheduled section allows you to edit any upcoming scheduled messages before they are sent. You can change the message content, the sending method, and when the message is scheduled to be sent.
Settings
The settings button is a quick link to your Notify settings where you can update grade mapping, manage the default intro message, and verify additional Caller IDs.
Related Articles
Notify Basic Dashboard ~ Sending a message
Notify is your mass notification system. You will use this system to send emails, texts, and phone calls to different blocks of subscribers. As a teacher or school administrator, you will have access to the Notify Basic Dashboard, also referred to ...Notify - Custom Lists
Notify is your mass notification system. You will use this system to send emails, texts, and phone calls to different blocks of subscribers. As a teacher or school administrator, you will have access to the Notify Basic Dashboard, also referred to ...Campus Life - Messaging
Messaging Here you have the option to send messages to your E-notes groups directly from the app, or to create Emergency Alerts to be displayed on your website. Emergency Alerts Here you will have the option to create an Emergency Alert which will ...Notify 360 - A Platform for Two-Way Communication
Notify 360 - A Platform for Two-Way Communication What kind of lists are able to receive replies? At this time, only Notify lists can have 360 replies enabled. Dynamic lists and Combined list will not have that setting at this time. Create a list. ...Notify Sign Up stack
Notify Sign Up stack What is the Notify Sign up stack for? The Notify Sign Up stack is a module designed to allow for family members to sign up to receive Notifications sent through the Notify platform for any qualifying lists. They can also manage ...