Cashless Campus / Online Store
Cashless Campus/Online Store
Online Store Settings
- Default "Online Store" if not set
- This will show at the top of the store as well as in the navigation
- Give your store a Name to better advertise and draw interest!
- If you know the local tax rate go ahead and include it so it is there when needed
- If there is ever a possibility of you needing to ship items please include a max shipping rate
- Set the MAX shipping rate to avoid situations where someone purchasing 10 items would pay the shipping rate x 10 rather than a single price for their single order.
- Credit Card
- Electronic Check
- Purchase Order
- This area comes with a default statement but can be altered to fit your needs and specific processes.
6. Store Advertisement options
- Main Link Item
- Automatically creates a tab for your store at the top of your site.
- Sidebar Module
- Advertisement for your store can be added to any page's sidebar layout.
- Page Stack Item
- Advertise your store with a pre-created ad link on your home or other Page Stack page.
- To add your Online Store link to a Page Stack Simply click on the Online Store Link in your Media Options and Click the eye on the stack item to turn it on.
- Don't Forget to save your changes before moving on to the next section.
Store Accounts Setup
- Mass upload Merchant Account information by entering Accounting Code, Description, and Merchant Account or upload bulk account information in CSV format.
- Layout example and Sample CSV can be found by clicking the red Required Details button in the top right hand corner.
- Once your Account Code(s) have been added they will in a list below in the "Manage Account Information" area
- Here you can use the pencil to edit the Account Description and whether it is available at a single campus (For Multi-Site Districts) or at the District level only.
- You can use the red trashcan to delete an Account Code
Notification Settings
- Add New Notification Option
- Accounting Code
- Choose what codes you want to receive notification from
- Contact info of the person needing to receive purchase Notifications
- Full Name
- Email address
- Click ADD
- Repeat process for each code that person needs to receive or to add additional notifications for other recipients.
- Below your notification settings you will see the option to manage/delete existing notifications.
Reports
Transaction Report
Order number, customer name, student ID, payment type, amount, date
If you are looking for a particular order you can filter this report by order number, customer name, student ID, Payment Type, Charge Amount, Expected Deposit, Date.
- Click on the order number for additional details
- You can download a PDF file of the order or print it from this page.
Accounting Reports
- Generate accounting reports quickly by going to Reports --> Accounting Reports
- Choose a date range
- Last 30 days
- Current/Previous Month
- Weekly reports
- Custom Date Range
- Filter Option
- Filter by account number
- Click the download option to get a CSV file of your report
- Click the arrow next to the Account title to see individual transactions and get transaction details.
- Click the Eye to show hidden accounts
By default accounts with no transactions are hidden.
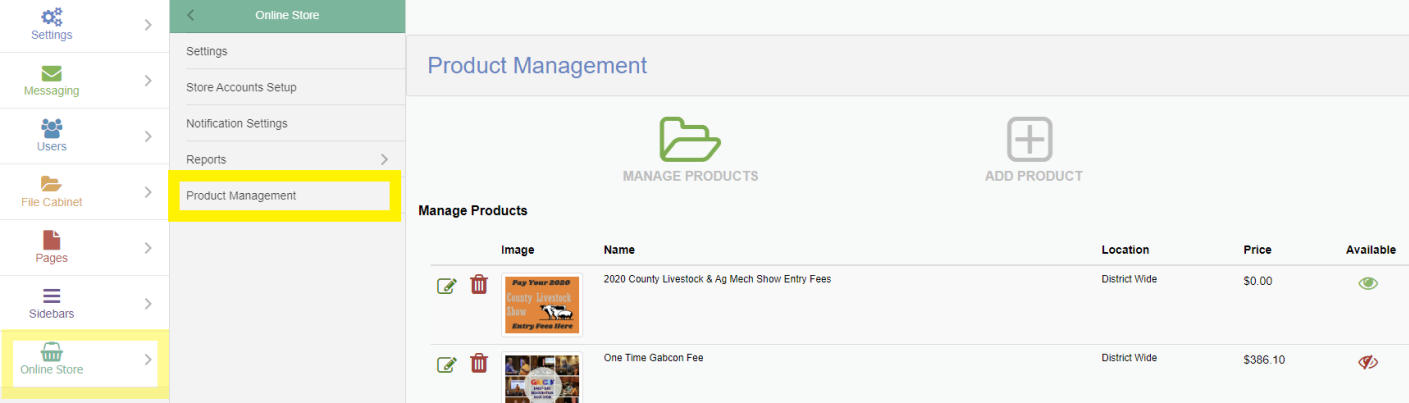
Product Management
Add Product
- Give your Product a Title
- Include a description of the product.
- If you mark "Yes" it will appear in the store for purchase as soon as you Save
- If you mark "No" the item can be made visible for purchase in the store later. This allows you to add products you know are coming but are not yet available. You can build them in the store ahead of time and have them ready to go with the click of a button when they are ready for purchase!
8. Require Student ID -
- You can require a Student ID to be entered to make this purchase
- This can be helpful with items such as class dues or other fees
9. Taxable Product - Yes or No
- If this product is taxable please verify that your tax rate has been set up in the Settings area of your Online Store
10. Physical Product - Yes or NO
If YES
Select whether the product is shippable and enter a shipping price per item
This will not exceed the maximum shipping fee entered in your store settings.
If No Shipping is offered
Enter pick up Details
Product Options
Size
Description
Price adjustment
Click Add Options to add additional Product Options
Name your Product options, for this example I used size and color.
Include a Description of that option (size, color, etc.)
Click the green plus sign to add additional options
Turn off the Visibility as supply runs out by clicking on the green eye
Price Adjust
include the difference in price from your base price for your different description
Example: if Extra Large Shirts were $2.00 more you would enter 2.00 the the adjustment box next to that option.
Click Update Product Options to save your changes
Upload photos
Drag and Drop Option for images
You can also upload from your computer by clicking 'Select Photos'
You have the ability to upload multiple images
Star indicates first image
X deletes
Eye changes visibility
Select ADD PRODUCT
Manage Products
Click the Pencil to edit an existing Product.
Click the Trashcan to delete a Product.
Click the eye to change the availability of the product
Related Articles
Online Store - Product Management
From the Site Administration Page click The Online store button and Select Product Management. Selecting Product Management will bring you to the "Manage" products screen. You should see the Title, Image, Name, Price Quantity, and Visibility ...Online Store Account Setup
Accounting Codes are used to classify financial activities. All transactions will be deposited into a single account however we can use accounting codes to distinguish how these funds should be handled or distributed. If your school or organization ...Creating a Parent Profile for Cashless Campus
You have the ability to create a Parent Profile for your school's Cashless Campus. You can access the sign up module in two locations. 1. When you go to check out, you will be asked to login, sign up or continue as a guest. 2. On the Store homepage ...Cashless Campus - Notification Settings
Cashless Campus/Online Store You can locate your School Store by clicking the Store icon on your dashboard or clicking Online Store from the navigation panel on the left. Notification Settings In this area you can set up notifications to go out ...Cashless Campus - Transaction and Accounting Reports
Cashless Campus/Online Store You can locate your School Store by clicking the Store icon on your dashboard or clicking Online Store from the navigation panel on the left. Reports Transaction Report In this section you can see details for individual ...